How to Add and Customize Widgets on Your Website
Widgets are powerful tools that can enhance the functionality of your website. They allow you to integrate third-party applications, add interactive elements, and improve the user experience. Whether you’re looking to add a weather forecast, social media feeds, a contact form, or even e-commerce functionalities, widgets can significantly expand the scope of your website’s features without requiring extensive coding skills.
In this article, we’ll walk you through the process of adding and customizing widgets on your website, step by step. By the end, you’ll have the knowledge to enhance your site with various types of widgets, optimize their appearance, and ensure they work seamlessly.
What Are Widgets?
Before diving into how to add and customize widgets, it’s important to understand what widgets are. A widget is a small, reusable piece of code or content that can be embedded into a website. Widgets typically offer specific functionality or content, such as:
Weather updates
Social media feeds
Search bars
Recent posts
Forms (e.g., contact forms, newsletter sign-ups)
E-commerce product carousels
Widgets can either be embedded directly into the code or added through a content management system (CMS) like WordPress, Wix, or Squarespace, which offer user-friendly interfaces for managing widgets.
How to Add Widgets to Your Website
The process of adding widgets to your website can differ depending on the platform you’re using. Below are the methods for adding widgets on some of the most popular website platforms:
1. Adding Widgets on WordPress
WordPress is one of the most popular CMS platforms, and adding widgets is simple:
Access the WordPress Admin Panel: Log into your WordPress admin panel using your credentials.
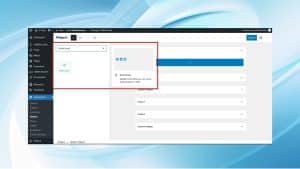
Navigate to the Widget Section: From the admin menu, go to “Appearance” and select “Widgets.” Here, you’ll see all the widget areas that are available for your website (such as sidebars, footers, and header).
Choose the Widget to Add: On the left-hand side, you’ll find a list of available widgets, such as search bars, recent posts, or custom HTML. Simply drag the desired widget to the widget area you want it to appear in.
Configure the Widget: After dragging it to the widget area, click on the widget to configure its settings (e.g., title, content, display options).
Save Changes: Once you’re satisfied with the configuration, click “Save” to apply the changes.
2. Adding Widgets on Wix
Wix is known for its drag-and-drop builder, which makes adding widgets a breeze:
Log in to Wix: Open the Wix Editor and log into your account.
Add the Widget: Click the “Add” button (usually represented by a “+” sign), then select “More” and choose the widget you’d like to add. Wix has a large selection of widgets, including forms, social media buttons, and chatbots.
Drag and Drop: After selecting the widget, drag it onto your page where you’d like it to appear.
Customize: You can then customize the widget’s appearance and settings through Wix’s intuitive interface.
Preview and Publish: Once you’re happy with how the widget looks, preview the changes and publish the site.
3. Adding Widgets on Squarespace
Squarespace also offers an easy-to-use interface for adding widgets:
Open the Squarespace Editor: Log into your Squarespace account and open the website editor.
Access the Page Settings: Go to the page where you want to add the widget, and click “Edit.”
Add a Content Block: Click the “+” button to add a new content block to your page. Squarespace has many pre-designed blocks, including widgets for forms, social media, and newsletters.
Customize the Block: Choose the widget type, then modify its settings to match your needs (e.g., title, layout, colors).
Save and Publish: After configuring the widget, click “Save” to finalize the changes and make your website live.
How to Customize Widgets
Adding a widget is just the first step. Customizing its appearance and functionality is equally important for making it fit the design and purpose of your website. Here’s how you can customize widgets to match your site’s branding:
1. Customize Widget Layout and Size
Many widgets allow you to adjust their size and layout to suit the space available on your site. For example:
Resize: Adjust the dimensions (height and width) of the widget, especially if it needs to fit within a particular area, like a sidebar or footer.
Alignment: Use options like left, center, or right alignment to ensure the widget blends well with your content layout.
If you’re using a CMS, such as WordPress or Wix, you can usually resize widgets directly through the drag-and-drop interface. If you’re editing the widget code, you may need to modify CSS (Cascading Style Sheets) rules to adjust the size and alignment.
2. Styling the Widget with CSS
For more advanced customization, CSS allows you to style widgets extensively. CSS lets you control fonts, colors, borders, spacing, and more.

3. Adjust Widget Settings
Widgets often come with built-in settings that allow for a variety of customizations. For example:
Form Widgets: If you’re adding a contact form or newsletter sign-up widget, you can adjust the fields that appear, set the email notifications, and customize the form’s colors to match your site’s theme.
Social Media Widgets: If you’re embedding a social media feed, you can often customize the display (e.g., showing recent posts, likes, or followers) and choose from different layout styles (grid, list, or carousel).
Content Widgets: For things like recent posts or product displays, adjust the number of items shown, their order, and even the display format (e.g., list or grid view).
Best Practices for Widgets
While widgets are great for enhancing your site, it’s important to use them effectively. Here are some best practices:
1. Avoid Clutter
Too many widgets can overwhelm visitors and make your website look cluttered. Stick to adding widgets that serve a clear purpose and enhance user experience. For example, don’t overcrowd your sidebar with too many social media buttons or excessive promotional banners.
2. Ensure Responsiveness
Make sure the widgets you add are mobile-friendly. Many users access websites via smartphones and tablets, so it’s crucial that widgets adjust to different screen sizes without breaking the layout.
3. Monitor Performance
Widgets can sometimes affect your website’s loading speed, especially if they rely on external scripts or APIs. Use tools like Google PageSpeed Insights to ensure your site loads quickly even with widgets in place.
Conclusion
Widgets are a simple yet effective way to enhance the functionality and appearance of your website. Whether you are looking to add interactive elements, social media feeds, or forms, the process of integrating and customizing widgets has never been easier.
By following the steps outlined above, you’ll be able to add and customize widgets to improve user experience and increase engagement on your site. Just remember to keep the balance between functionality and design, ensuring that the widgets you use enhance your site’s performance and overall aesthetic.